Sunday, October 18, 2009

Kim's Book- Fragments,Vestiges & Remains

Update #2-Covers Completed -25 October

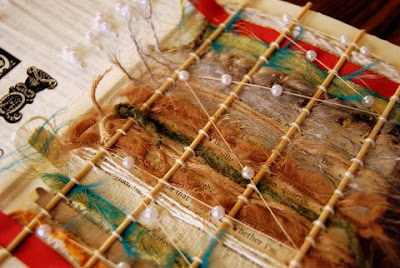
Well I have finished the covers of the book at last, well at least as much as they will be done before they zoom off to all the other collaborators for their round the globe trip. I have more to add, a collection of brass fittings, but will add none of these items until the book makes it's final return back to me here in the land of tropical paradise. Too much postage weight!


I have added a fragment of book text.


Well I did say a fragment!


Then I filled the niche with the remains of a burned photograph...


and the vestiges of the belt buckle after its transformation...


I add a few other details...


the remnants of some chain...


all that remains of some beads I have particularly liked...


and the covers have come together at last.


So here it is...


'Fragments Vestiges and Remains'


a story about the little pieces...
Posted by Picasa


Update #1 Cover Play - 21 October
Well blog readers, time to progress on.

After all the fun of burning it's time to change the colour of the covers. The deep blue isn't really what I'm after so it's time for some colour fun. After a little contemplation I decided I rather liked the boards and their aged fabric look so why not just give them a small renovation, and update their colour. Bit like one's home really. I decided to add some walnut ink, I love the oldtime feel this ink gives to everything it touches. A third of a bottle and 2 drying days later to make sure the boards and covers are completely dry,
here's the result...


Better I think. As I said it has kept the book covers natural distressed look without changing anything except the colour.

I like it!

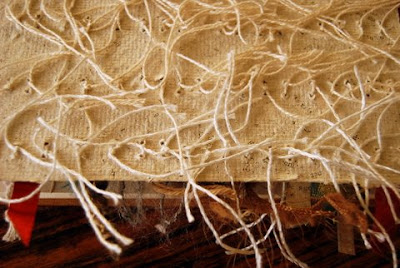
I decide to continue with the inking fun and have dyed some fabric remnants to add to the covers.
Gotta keep with the theme here! LOL!


I have kept going with the walnut ink to build on the aged look for the covers, dying the cheese cloth and tulle to match the new colours.

Time to glue them to the book cover.

That done the drying is now underway.


Time to work on some embellishments.
This was originally a very ugly belt buckle, but like everything else it's had a makeover and will go over the burnt hole in the front cover.


Getting there. Now to wait for the drying...

I'm sooo impatient!

Posted by Picasa


Time to Start - 18 October

Okay, so finally I'm on the mend from whatever the latest round of nasty virus is and it's time to blog some art, Yay!
I am so excited to be a part of this collaboration with this talented group of artists! So after much soul searching and internal debate I finally decided on a topic and format for my part in Pulp Redux!

It has a title, or at least it will soon enough, LOL!

How about...

Fragments, Vestiges and Remains!


I rather like bits of things, especially anything that's antiquated, vintage or just plain old and interesting. What can I say, I'm just curious!
I rather expect you can take this theme to include almost anything you like really. Perhaps fragments of art, text, textiles, texture (drool!!!) or something a little more esoteric maybe. A fragment of an interesting person's life, or a period of time!
Anyway you decide, I am sure it will be interesting and hopefully there's lots of scope for all players to find something that interests them within the theme.

It will be a book! I rather mean an already exisiting one rather than a newer construction, which I did consider but then rebuffed as I rather thought the title of the collaboration warranted my finding an already exisiting book and repurposing it.

So here's my book.


It is 10" x 7" so large enough pages for plenty of fun. The book is an old Dutch textbook-'An Introduction to English Art'.


Here's a brief look inside.


Aren't the art pics lovely! Gainsborough Yumm!
Now I have removed approximately a third of the pages to make a little room for lumps and bumps with the intention that I will likely have to rebind the book after it finally makes it's way back to Oz. Sorry girls but the lovely pics constituted the removed pages of the book. I decided they were too good to waste and will keep them for inclusion in other projects, but I rather think one or two may end up in Andrea's book somehow! I decided to keep the book bound this way so participants don't have to pay for the extra weight of bindings in the postage at present and I will just sort it out at the end. The book has been divided into six sections to accommodate everyone which means that after trimming the pages everyone has approximately 15 pages (30 if you count both sides) each to play with. Not too many but the paper is quite a good thickness and sturdy enough for some quality play. This will also stop the postal weight and costs being too prohibitive, at least I hope so!


So now it's time to do something with the books covers!
As you can see it's a board and cloth bound book, navy blue colour.
Might have to change that I think, but first, the heavy duty alterations.


Chop, chop, wow book boards are tough going to cut!!!
A small hole to create a recess in the cover.

And now those of you that know me, know I can't resist a good burning...
so guess what's next...


Burning, yay, (the fire bug's at it again, LOL!).

I have burnt the cover and first few pages to create a shallow niche in the front of the book to create a new title.

Here's how it looked after the burning session.


Getting there! Now maybe it's time to do something about that blue colour...

Posted by Picasa

Wednesday, October 14, 2009

Debrina's Book - Through the Eye Glass


Update #6

Finished portfolio cover - I'll get a less fuzzy photo up tomorrow hopefully


Beginning of page 2 with feature window (hmmm...I need to lower that bottom right stud...)


Window feature open (yes, I definitely need to fix that stud!)

Page 1 will remain a surprise - you'll see it when it comes in the post!

Update #5


Portfolio - stitching commences (with a cup of tea for fortitude)

I've been so busy doing other projects since my last update (altered matchboxes, aceos, atcs, an art exchange, my exhibition pieces and mail art) that I actually had to put the book aside for a little while.  Now that these things are out of the way, I've had much more time to solely concentrate on our project.  Don't get me wrong, I LOVE this project, but I also don't like unfinished business.


Stitching finished (yay!)

So, a lot has happened since I last posted.  Firstly, the portfolio got a good going over with paper, paint, dye (lots of texturising you could say) and then, finally, crackle medium.  I wanted to achieve a real shabby but interesting cover: antiquated and a bit Victorian Sci/Fi.  The herringbone stitch (above) isn't just decorative - it has a practical purpose to it to.  Basically it holds the portfolio together, lol! 

Folded up and finished, now, the portfolio looks like this:


Finished portfolio

The writing is of course, the title: Through the Eye Glass.
Here's a close up:


Close up of eye piece and title of book


Now I'm working on my pages of the book.  I've manufactured an eye-glass (one of those old fashioned ones favoured by the Victorian gentlemen) by busting up an old pair of doll's spectacles and attaching a silver chain.  I've also found a photo that represents my invented heroine, Maude Newton.  Maude's a recently widowed 32 year old, who's found a new lease on life.  With her husband dead and buried (oooh that sounds so callous), her newly found freedom and small fortune have afforded her a trip around the world.  Also with the money left to her by her late husband, Maude has invested in an eye glass.  Maude's always had poor eyesight but out of vanity refused to wear spectacles in front of her husband (her husband, in fact, was never aware that his wife had poor eyesight - she kept it so well hidden).  Now that Maude has her eye-piece (an eye piece is so discreet when you can just tuck it into your pocket or purse), the world has taken on a different meaning...and that, my dear artistic chums, is where you fill in the gaps!


Here's Maude (and her belated husby), her eyeglass, an excerpt from her diary (and the diary cover) and peeking through all that - the first page of the book:
(CLICK on the image to enlarge)

And here's the diary excerpt (and the first page of my book - which has barely been started) in its entirety:


As you can see, Maude is quite atypical of her generation.  She's a bit of a messy pup (look at the stains on that diary entry) and a real adventuress.  She's aware of societal norms, of course, and keeps up the ruse on the surface, but deep down she's a tiger!

Update #4
If you've read my other blog, you'll know that I've been busy this weekend working on all sorts of art projects, but did manage to fit my book in too.  I've decided NOT to bind my book until you guys have finished doing your thing to it.  That way I can accomodate it's new thickness (eg, any dimensional work you guys do).  My plan is to create an encasing for it - a bit like a portfolio cover that opens up to reveal the book (see the one I've mocked up below).  I have set the eye piece onto the top part of the portfolio (the flap), just to set the theme and I will use this mock-up in the final version of the cover.  In the meantime I am starting to work on the first two pages - you each get two opposing pages to play with.  I've also set a margin (which you can paint over but must not embellish, as that will be where I bind the book.  Anyway, don't panic with all these "instructions".  I'll put a set of notes in the parcel before I send it off!


As you can see, the brown cardboard is the inside of the portfolio.  It will latch together when folded up.  Currently it fits "the book" quite snugly, but it will need to be remade in order to accomodate the actual book as we build it up with our artwork. If you blow this picture up larger, you can see where the margins are for binding. I've also alternated the page layout so that the circle is not in just one place on every page...

Ooooh and the miniature book is for each of your autographs and a little vignette that represents you as an artist: be it your work, inspiration or your muse...

Update #4a
OK...so here's some more pictures to help clarify things:

Here's the eye piece...


Open the top flap...


then the bottom flap...


Open up the book and turn the pages.

I've thought some more about the hole placement.  I'll let you decide in which position you want to have it.  You just need to flick the entire page over.  I hope you experiment with it.  Also, the portfolio is temporary.  It will only be enclosed in your parcel to inspire you and tickle your fancy.  I think it's really important for us to see each others work up close and personal...so you can hold it, touch it, sniff it, look at it...etc.  That's SO important don't you think?


Update #3
Not really an update as such; more inspiration.  Look what I found at Brian Dettmer's Book Autopsies


Update #2


"Through the Eye Glass"
Copyright 2009  -  D.Price-Ewen

Ok, I am so darn excited about this project that I just haven't been able to stop thinking about it in the last 48 hours!  I'm zinging with creative zinginess and it's so bad, I'm not sleeping that well...ha ha.  Look at the time will you: 11:30pm (NZ) and I have to get up at 6.30am tomorrow for work!  But I just had to join in the fun and post my theme!!!

Well, I had the most amazing photographs of the work I'd done on my book to date (as in just this evening), then my camera died.  I hate my camera...it's old and cruddy and I want a new one.  Damn it, I need a new one!  Problem is I'm as poor as a pauper right now...so for the time being, these photos - taken on my cell phone (yes, I know, tragic isn't it?) - will have to suffice.

I promise you I will beg, borrow or possibly steal a camera before the week is out, so that I can match the standard of photography you guys are doing (Lisa, your close up is astounding). 

Ok...so here's my theme:


"Through the Eye Glass". 

I made my eye glass out of cardboard, paper, metal, plastic, and laminate.  I've dyed and painted the circular cardboard frame to give it its rusty metallic colour.  The book is made from scratch (hand bound) and is tiny (1.5" x 2" or 4cm x 6cm).  This book accompanies the larger book (the board book I'm busy gessoing), which the eye sits upon.  The larger book still needs a lot more background paint to get it nice and opaque.  The cover will be aged and antiqued with crackle then painted an off-white, almost cream, colour...
My head is still whirring with ideas...my heart is beating a bit too fast as I write this...if I don't die from a heart attack tonight from the sheer excitement of this project of ours, I hope to do MUCH more tomorrow.
Nighty night everyone....

Update #1
Ummm...yes, well, I kinda have started mine already, Alicia (LOL!)...how did you know? I've just put on the first coat of gesso....can you see the bear peeking through?


This book measures 6" x 7". Postage here to the States and Aussie is not cheap - so I haven't gone huge. Just kept it small and lightish.

Monday, October 12, 2009

Lisa's Labyrinth Book


Update 7, Nov 2.
Well here they are, 2 completed spreads in my book. I am not planning on doing any more than that or there won't be room for you guys! lol. I still have to do my last signature which will hold some swap pieces.In between each signature is a piece of paper which I have glued in which will act as each persons VD page/Notes/Sign area or what ever else you want to use it for. Also, just because I have done a page to interpate the definition of Labyrinth dosn't mean you have too...just what ever comes to mind when you think of Labyrinth!


Update 6. October 27.
My finished cover. Its not perfect but over all I am happy with the result. I used wax to fill the niche and set the circuit board into it. It's settled a bit flatter than what it looks here. Sure hope my book dosn't encounter any hot places on it's way around the globe though!


Update 5
Ok, so here's the cover nearly finished. The foam board was covered with pva glue and gold tissue paper and then it underwent a treatment of indian ink and watered down gesso until I was happy with the look. The copper foil was eventually found and bought and as you can see it looks great around the niche! Great advice:) The book cover itself was red so I rubbed indian ink onto it using make-up pads. I still need to stick the circuit board in proparly...

The pic above makes my book look reallly fat and I am only posting it here because I love it:)
The photo below shows how the foam has gone and bowed on me BUT I think I've taken care of that with a liberal does of glue and the use of my flower press! (Bottom pic.)

-----------------------------------------------------------------------------

Update 4
Ok, so here's what I am playing with at the moment. My son is a 'pull it apart to see what it's inside' kinda boy. He's after the motors and lights from things and I occasionally inherit bits of copper wire and circuit boards. I stopped getting them from him because I wasn't using them, I just like them coz the look pretty! Anyway, today one of them got put to good use and I cut a niche from foam board to put it in for my books cover. Isn't it beautiful and jewel like? and the maze pattern is just perfect for labyrinth! As you can see I've cut the niche a bit crooked (!!) so I will need to figure out how to fix that...maybe I am going to have to cut the whole thing bigger now and then some how fill in the 3mm gap I will have? Doh!
Also, I am going to fix this foam board to the cover of my book, am thinking of using PVA but not sure if it is durable enough? Any suggestions of what glue to use? I have also done a bit more inside my book but that will be another post as the kids need to be picked up from school very soon!


------------------------------------------------------------------------------


Post 3.
This book is in my mind, thoughts and dreams 24/7 lately so I am so pleased to have had 3 whole hours to play today and an hour yesterday! I am loving the way it's coming out so far. I've done most of my 'title' page too (not photographed yet) and you can see a teeny peak of it in the top photo. The weaving thing had the last minute addition of the beads which slide along the cotton a bit like a abacus but in a different direction. I love the rythmn of them as you slide them along. The word 'entanglement' became quite literal at several points today but this has been such a labour of love it's hard to put down! I am sure you all know the feeling!

_____________________________________________________


Post 2.
I am being bad,very bad. I should not be here doing this post or playing with books but the urge was to strong...I just finished tying the last kebab stick to my page, they will form the framework for a weaving of threads and papery things. The back of it is the photo below. I left the thread tails long so they'd tangle but I may tie things on to them as well...my thoughts are still thinking!

_____________________________________________________


Post 1

It's not much compared to the trillion and one ideas I have for this book in my head but here's a sneak peek at my books begininngs! My theme is Labyrinth. Not as in David Bowie Labyrinth but as in the dictionary definition of the word "intricate and tangled, windings, entanglement" which to me describes anything from a nest (suprise! suprise!) to intiricate celtic work and old vintage letters....in the days of sloped and curly handwriting not computer fonts!Anything that is interwoven, bound or maze like... I look forward to seeing how everyone else translates it when this book moves around each player!

What you see here is my book (an old novel) divded into signatures for each player (my husband is drilling the cover for me later so I can add another) and a sneaky glimps of 2 of my bound pages.